THREE-POINT LIGHTING, WHAT EVERY FILMMAKER, PHOTOGRAPHER, AND 3D ARTISTE NEED TO KNOW.
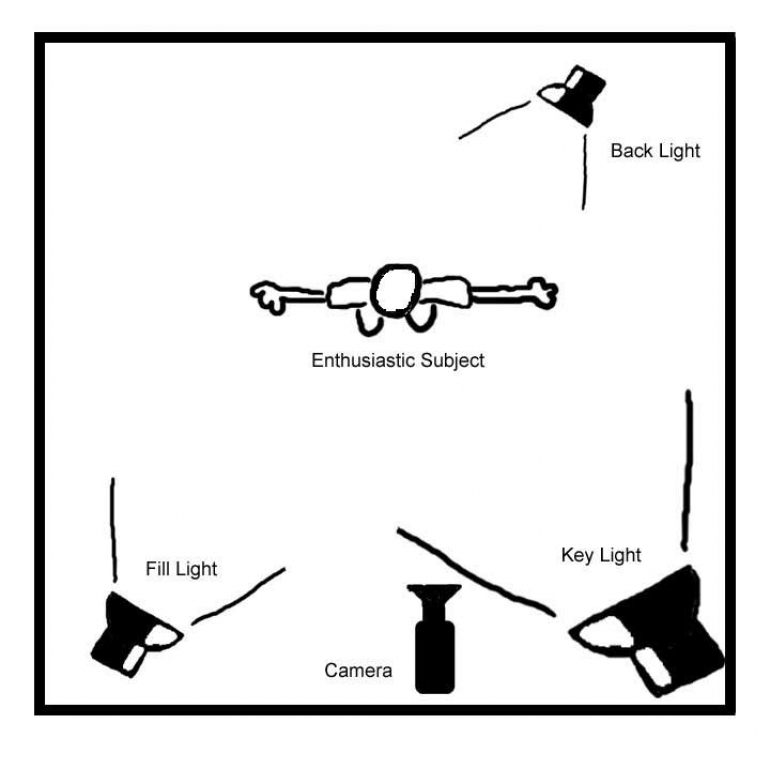
Three-point lighting (also known as the lighting triangle setup) is a standard method used in visual media such as theatre, video, film, still photography, and computer-generated imagery. By using three separate positions, the photographer can illuminate the shot’s subject (such as a person) however desired, while also controlling (or eliminating entirely) the shading and shadows produced by direct lighting. Now that you have your lights it’s handy to know how to use them. Turning them on and pointing them at your subject is a good start, but if you really want to get the most out of them you can use what’s known as “the lighting triangle.


KEY LIGHT
The key light, as the name suggests, shines directly upon the subject and serves as its principal illuminator; more than anything else, the strength, color, and angle of the key determines the shot’s overall lighting design.
In indoor shots, the key is commonly a specialized lamp or a camera’s flash. In outdoor daytime shots, the Sun often serves as the key light. In this case, of course, the photographer cannot set the light in the exact position he or she wants, so instead arranges the shot to best capture the sunlight, perhaps after waiting for the sun to position itself just right.

A portrait with the key lighting: a 300-watt key light
FILL LIGHT
The fill light also shines on the subject, but from a side angle relative to the key and is often placed at a lower position than the key (about at the level of the subject’s face). It balances the key by illuminating shaded surfaces and lessening or eliminating chiaroscuro effects, such as the shadow cast by a person’s nose upon the rest of the face. It is usually softer and less bright than the key light (up to half), and more to a flood. Not using a fill at all can result in stark contrasts (due to shadows) across the subject’s surface, depending upon the key light’s harshness. Sometimes, as in low-key lighting, this is a deliberate effect, but shots intended to look more natural and less stylistic require a fill.
In some situations, a photographer can use a reflector (such as a piece of white cardstock mounted off-camera, or even a white-painted wall) as a fill light instead of an actual lamp. Reflecting and redirecting the key light’s rays back upon the subject from a different angle can cause a softer, subtler effect than using another lamp.

A portrait with the fill lighting: A 150-watt fill light.
BACKLIGHT
The backlight (a.k.a. the rim, hair, or shoulder light) shines on the subject from behind, often (but not necessarily) to one side or the other. It gives the subject a rim of light, serving to separate the subject from the background and highlighting contours.
Backlight or rim light is different from a kick in that a kick (or kicker) contributes to a portion of the shading on the visible surface of the subject, while a rim light only creates a thin outline around the subject without necessarily hitting the front (visible) surface of the subject at all.

A portrait with the backlighting: A 300-watt backlight
The addition of a fourth light, the background light, makes for a four-point lighting setup.
The background light is placed behind the subject(s), on a high grid, or low to the ground. Unlike the other three lights, which illuminate foreground elements like actors and props, it illuminates background elements, such as walls or outdoor scenery. This technique can be used to eliminate shadows cast by foreground elements onto the background or to draw more attention to the background. It also helps to offset the single-eye nature of the camera; this means that it helps the camera give depth to the subject.

Arrows pointing at the background lights.

